首页
关于
标签合集
友情链接
Search
1
一些简单方面的Linux生产随机密码shell
350 阅读
2
美超微主板IPMI使用教程
324 阅读
3
Ubuntu系统开启root登陆权限
250 阅读
4
linux下502自动重启脚本
230 阅读
5
利用廉价VPS做反代,保护你的真实服务器
178 阅读
OS
促销资讯
管理系统
网站运维
网文资讯
登录
Search
标签搜索
网站架构
linux
网站运营
centos
mysql
google
nginx
ssh
apache
服务器
kloxo
vps
架构分析
PHP
特价VPS
xen
shell
数据库
lamp
vpn
装逼爱好者
累计撰写
163
篇文章
累计收到
20
条评论
首页
栏目
OS
促销资讯
管理系统
网站运维
网文资讯
页面
关于
标签合集
友情链接
搜索到
82
篇与
的结果
2014-07-24
Mac系统打包创建ISO
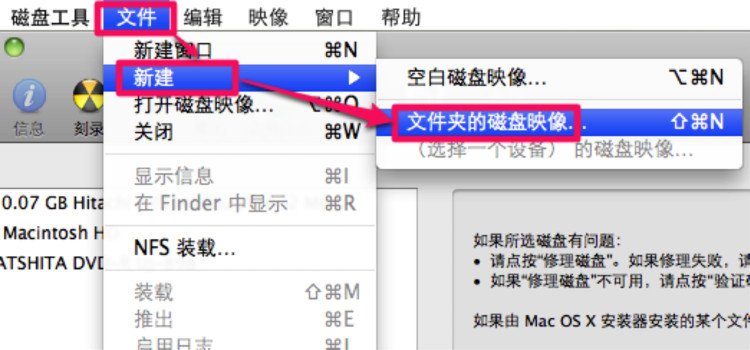
运行磁盘工具,选择文件,新建,文件夹的磁盘映像运行磁盘工具,选择文件,新建,文件夹的磁盘映像,选择要做成ISO的文件夹,点击映像。映像格式选择“DVD/CD主映像”,点击存储后会生成一个cdr文件。运行磁盘工具,选择文件,新建,文件夹的磁盘映像 选择要做成ISO的文件夹,点击映像。 映像格式选择“DVD/CD主映像”,点击存储后会生成一个cdr文件。 开一个终端,运行红线下的命令,就能把cdr转换成iso了。hdiutil makehybrid -iso -joliet -o 生成文件.iso 打包文件.cdr
2014年07月24日
28 阅读
0 评论
0 点赞
2014-07-14
出现page allocation failure. order:1, mode:0x20解决办法
最近有机器遇到一问题:nginx: page allocation failure. order:1, mode:0x20 Pid: 18448, comm: nginx Not tainted 2.6.32-431.17.1.el6.x86_64 #1以下是在百度上找到的信息:dmesg里报出这个信息,然后机器负载开始上升,而实际上用free可以看到还有大量的内存被buffer/cached因此不应该出这个问题才对,我的系统是centos6,上centos的论坛查了一圈,有人回说是内核的bug一个临时解决方案是sysctl -w vm.zone_reclaim_mode=1关于zone_reclaim_mode的定义kernel的文档里描述如下Zone_reclaim_mode allows someone to set more or less aggressive approaches to reclaim memory when a zone runs out of memory. If it is set to zero then no zone reclaim occurs. Allocations will be satisfied from other zones / nodes in the system.This is value ORed together of1 = Zone reclaim on 2 = Zone reclaim writes dirty pages out 4 = Zone reclaim swaps pageszone_reclaim_mode is set during bootup to 1 if it is determined that pages from remote zones will cause a measurable performance reduction. The page allocator will then reclaim easily reusable pages (those page cache pages that are currently not used) before allocating off node pages.It may be beneficial to switch off zone reclaim if the system is used for a file server and all of memory should be used for caching files from disk. In that case the caching effect is more important than data locality.Allowing zone reclaim to write out pages stops processes that are writing large amounts of data from dirtying pages on other nodes. Zone reclaim will write out dirty pages if a zone fills up and so effectively throttle the process. This may decrease the performance of a single processsince it cannot use all of system memory to buffer the outgoing writes anymore but it preserve the memory on other nodes so that the performance of other processes running on other nodes will not be affected.Allowing regular swap effectively restricts allocations to the local node unless explicitly overridden by memory policies or cpuset configurations. 这个参数告诉内核当内存不够用时就直接回收buffer/cache
2014年07月14日
29 阅读
0 评论
0 点赞
2014-05-10
Xen出现nf_conntrack: table full, dropping packet.的一些解决调整参数
我们的Centos6 x64_64系统的Xen宿主内核出现了一些日志,相应状况有网络丢包的现象发生。nf_conntrack: table full, dropping packet. nf_conntrack: table full, dropping packet. nf_conntrack: table full, dropping packet. nf_conntrack: table full, dropping packet. nf_conntrack: table full, dropping packet. nf_conntrack: table full, dropping packet. nf_conntrack: table full, dropping packet. nf_conntrack: table full, dropping packet. nf_conntrack: table full, dropping packet. nf_conntrack: table full, dropping packet.根据网络搜索得到的方法,将内核的一些默认参数适当调整可以解决这个问题 [root@node61 ~]#cat /proc/sys/net/netfilter/nf_conntrack_max 24528 由于nf_conntrack_max的默认参数设置比较小,所以适当的调整一下它. 运行下面的代码cat >>/etc/sysctl.conf<<EOF net.nf_conntrack_max = 2097152 net.netfilter.nf_conntrack_tcp_timeout_established = 300 net.netfilter.nf_conntrack_max = 1048576 net.netfilter.nf_conntrack_tcp_timeout_close_wait = 60 net.netfilter.nf_conntrack_tcp_timeout_fin_wait = 120 net.netfilter.nf_conntrack_tcp_timeout_time_wait = 120 net.ipv4.conf.default.forwarding = 1 EOF sysctl -p以上代码中的参数仅供参考,请根据实际情况进行设置.然后持续监控您的内核日志看情况.
2014年05月10日
18 阅读
0 评论
0 点赞
2014-05-10
Xen出现Too many frags以及fatal error; disabling device日志,子系统断网解决办法
Xen有些时候一些GUEST OS系统正常运行中但是网络断了,直接重启后网络又恢复了。 从dmesg里面查看相应的信息发现出现了Too many fragsvif vif-162-0: vifXEN_NAME.0: Too many frags vif vif-162-0: vifXEN_NAME.0: fatal error; disabling devicegoogle了一下从一些mail list里面找到了解决办法,就是关闭tx和tso以及gso.先查看网卡ethtool -k 网卡运行命令会得到以下返回数据(一些机器返回的结果可能会有出入)[root@node75 ~]# ethtool -k eth0 Features for eth0: rx-checksumming: on tx-checksumming: on tx-checksum-ipv4: off [fixed] tx-checksum-ip-generic: on tx-checksum-ipv6: off [fixed] tx-checksum-fcoe-crc: off [fixed] tx-checksum-sctp: off [fixed] scatter-gather: on tx-scatter-gather: on tx-scatter-gather-fraglist: off [fixed] tcp-segmentation-offload: on tx-tcp-segmentation: on tx-tcp-ecn-segmentation: off [fixed] tx-tcp6-segmentation: on udp-fragmentation-offload: off [fixed] generic-segmentation-offload: on generic-receive-offload: on large-receive-offload: off [fixed] rx-vlan-offload: on tx-vlan-offload: on ntuple-filters: off [fixed] receive-hashing: on highdma: on [fixed] rx-vlan-filter: off [fixed] vlan-challenged: off [fixed] tx-lockless: off [fixed] netns-local: off [fixed] tx-gso-robust: off [fixed] tx-fcoe-segmentation: off [fixed] fcoe-mtu: off [fixed] tx-nocache-copy: on loopback: off [fixed] rx-fcs: off rx-all: off执行以下命令关闭tx tso gsoethtool -K eth0 tx off tso off gso off关闭后再用ethtool查看网卡会看到下面三个都为off关闭 tx-checksumming: off tcp-segmentation-offload: off generic-segmentation-offload: offtso的全称是tcp-segmentation-offload, gso的全称是generic-segmentation-offload 关于更多相关信息可以查阅http://en.wikipedia.org/wiki/Large_segment_offload以上内容是在基于Centos6 X64,kernel 3的环境撰写。
2014年05月10日
15 阅读
0 评论
0 点赞
2014-05-02
调整解决ssh连接自动断开问题
一些时候开着的ssh窗口经常自动断开, 有时候是网络状况不够稳定导致,通过调整sshd配置可以缓解一定的状况。sed -i 's/#ClientAliveInterval 0/ClientAliveInterval 15/g' /etc/ssh/sshd_config sed -i 's/#ClientAliveCountMax 3/ClientAliveCountMax 45/g' /etc/ssh/sshd_config service sshd restartClientAliveInterval 设置一个以秒记的时长,如果超过这么长时间没有收到客户端的任何数据, sshd 将通过安全通道向客户端发送一个”alive”消息,并等候应答。 默认值 0 表示不发送”alive”消息。这个选项仅对SSH-2有效。ClientAliveCountMax sshd 在未收到任何客户端回应前最多允许发送多少个”alive”消息。默认值是 3 。 到达这个上限后,sshd 将强制断开连接、关闭会话。 需要注意的是,”alive”消息与 TCPKeepAlive 有很大差异。 “alive”消息是通过加密连接发送的,因此不会被欺骗;而 TCPKeepAlive 却是可以被欺骗的。 如果 ClientAliveInterval 被设为 15 并且将 ClientAliveCountMax 保持为默认值, 那么无应答的客户端大约会在45秒后被强制断开。这个指令仅可以用于SSH-2协议.
2014年05月02日
36 阅读
0 评论
0 点赞
2014-05-02
[kipmi0]进程CPU 100%高占用率解决办法
服务器top进程上进程看到kipmi0经常占用很高的CPU甚至是100%看看专业的说法: kipmi is supposed to run with low priority. When you say it consumes 70-90% of the CPUs, is that constant (does it still consume the processor when they are other tasks in the process queue that should have a larger slice of the CPU time) or the 70%/90% comes when the machine is idle? A second issue to investigate is whether you have pending controller issues (alarms of varying nature that are not resolved) and/or older versions of controller firmware. 查看服务chkconfig 发现只有近似 ipmievd 服务,估计就是这个,跟网上资料说的ipmi有出入!Fix:不需要修复 No fix required. You should ignore increased CPU utilization as it has no impact on actual system performance.虽然这是一个利用空余的CPU资源进行一些接口自动调节的任务,但看着占那么多的资源还是怕出意外。找到:可以临时降低echo 100 > /sys/module/ipmi_si/parameters/kipmid_max_busy_usIn our system,after set this parameter,the cpu of kipmi0 decreased to 15%.确实执行上面命令后,所占CPU单核资源从100%降低到10%You can try this.永久性降低 To make the changes persistent you can configure the options for the ipmi_si kernel module. Create a file in /etc/modprobe.d/, i.e./etc/modprobe.d/ipmi.conf, and add the following content: # Prevent kipmi0 from consuming 100% CPUecho "options ipmi_si kipmid_max_busy_us=100">/etc/modprobe.d/ipmi.conf系统下次重启会自动调整
2014年05月02日
27 阅读
0 评论
0 点赞
2014-04-25
Mac OS X 挂在 ssh与 sftp 到本地
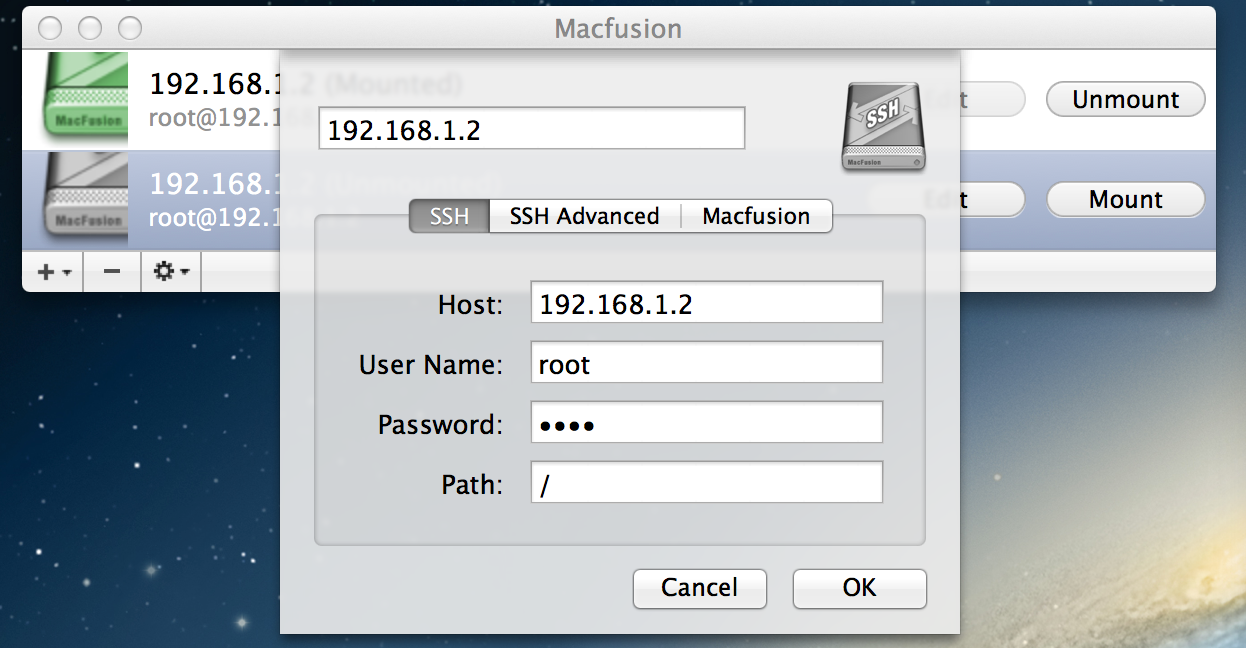
fuse在linux下可以挂载ssh和sftp,在unix的OS X下也是支持的.下面是解决方案:首先我们需要两个软件,OSXFuse和MacFUSE,下载地址https://github.com/osxfuse/osxfuse/downloadshttp://macfusionapp.org/步骤:1、安装 OSXFuse,它为我们提供了对 ssh、sftp文件系统的支持下载 .dmg,挂载之后,运行其中的 .pkg,按照步骤安装,如下图:2、安装 Macfusion,它为我们提供了一个方便挂载 ssh、sftp的界面下载的是 zip包,解压之后得到 .app文件,直接将其拖动到 “应用程序”目录几行啦。然后从 Launchpad中打开它。我的机器上,Macfusion有时候会崩溃,我们还是没使用 sshfs通过命令行来挂载 ssh文件系统。下载地址:https://github.com/downloads/osxfuse/sshfs/SSHFS-2.4.1.pkg使用方法:mkdir /Users/zpz/ssh.1.2 sshfs zpz@192.168.1.2:/home/zpz/ /Users/zpz/ssh.1.2/文章摘选自:http://zpz.name/2214/
2014年04月25日
127 阅读
0 评论
0 点赞
2014-03-09
openvz ppp设置
安装好openvz内核后还需要加载ppp的模块才能让guest OS支持pptpcat>>/etc/sysconfig/modules/ppp.modules<<EOF #!/bin/sh /sbin/modprobe ppp_async /sbin/modprobe ppp_deflate /sbin/modprobe ppp_mppe EOF chmod +x /etc/sysconfig/modules/ppp.modules bash /etc/sysconfig/modules/ppp.modules加载好ppp后还需要对guest os开启,下面已写好了functions直接在终端里面复制粘贴再执行openppp VID就可以了VID查询可以执行vzlist -aopenppp(){ vzctl set $1 --features ppp:on --save vzctl restart $1 vzctl set $1 --devices c:108:0:rw --save vzctl exec $1 rm -f /dev/ppp vzctl exec $1 mknod /dev/ppp c 108 0 vzctl exec $1 chmod 600 /dev/ppp }启用ppp后在vps里面就可以正常安装使用pptp了以上资料来自https://openvz.org/PPP_in_container
2014年03月09日
19 阅读
0 评论
0 点赞
2014-02-20
Ubuntu系统开启root登陆权限
1.安装openssh 2.sudo -i切换到root用户 3.修改/etc/ssh/sshd_config文件 PermitRootLogin yes AllowUsers root #网上很多文章都少改了这行 4.重启ssh服务 service ssh restart
2014年02月20日
250 阅读
1 评论
0 点赞
2014-02-20
Linux CentOS 32位ext3分区解压4G以上ZIP文件方法
如何在UNIX下解压超过4G的ZIP文件安装7za命令:wget http://nchc.dl.sourceforge.net/s ... .65_src_all.tar.bz2 tar -xjvf p7zip_4.65_src_all.tar.bz2 cd p7zip_4.65 make make install安装完毕,执行解压命令:7za x 解压文件.zip如下:7za x zipfile.zip
2014年02月20日
79 阅读
0 评论
0 点赞
1
2
3
...
9